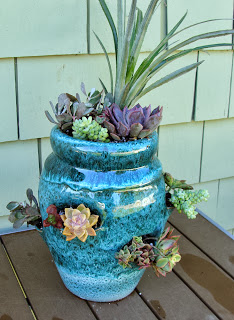
I'm going to share a simple project with serious 'wow' power that any beginner can complete, given some simple materials and 30 minutes of free time - a succulent-stuffed strawberry pot.
You will need:
- Plants
- Strawberry pot
- Potting soil
- Perlite
- Trowel or small shovel
- Bucket or other container for mixing soil and perlite
- Coffee filter or piece of hardware mesh (optional)
You will need a pot (I used this one, but any strawberry pot will do - for size reference, mine is about a foot tall) and some plants, of course. (My plants came from a few different Etsy shops - SteveSuperGardens, ShopSucculents, and SucculentOasis.)
You will also need some good quality potting soil and perlite (or pumice, if you can find it, in place of the perlite). In a bucket, make a 50/50 mix of the soil and perlite.
I keep a supply pre-mixed under my potting table for easy access. If you prefer, you can use cactus soil instead of this mix.
I like to put a paper coffee filter on the bottom of the pot to keep the soil from leaking out of the drain hole. You could also use a piece of hardware mesh, or a rock, in a pinch - or live life on the edge and leave the hole unprotected (gasp!)...
Next, you're going to fill the pot with your soil mixture to the bottom edge of the lowest planting holes in the pot. Gently water the soil in and add more if it settles.
Now the fun begins! Start setting those little plants in the holes. You can do just one plant per hole, or two if you like a really lush look.
This little guy wanted to tip out of the hole, so I weighed his roots down with a rock to keep him in place.
After you've finished the lowest layer, add more soil until it reaches the bottom of the next-lowest opening, add plants, and continue until you are near the top.
If you happen to inadvertently knock any leaves off while handling your plants, don't get rid of them! You can often use those leaves to grow new plants - for free! (Maybe I'll do a tutorial on that once I have a little more experience on the subject - in the meantime, succulent propagation tutorials abound on Pinterest, if you're interested.) Or if you don't want them yourself, mail them to me! :-)
At this point, it is of course time to fill up the top. I like to combine tall and spiky plants with lower and/or cascading ones for visual interest. The tall/spiky one in my arrangement one doesn't look like much at the moment, but look at the blooms it will display later if I manage to keep it alive!
Once you've filled in the top with plants, all that's left to do is water everything in and clean up your mess.
Try to position your lovely new creation where it can be admired from all sides, and rotate it periodically to give all the plants even exposure to the sun.
If you found this tutorial useful, please leave a comment, or share on Facebook, Pinterest, or wherever you hang out! And if you're a jewelry lover, please take a look at my work. Thanks!
Moissanite and recycled 14k yellow gold rings by McFarland Designs


3 comments:
Tamara, that looks like fun, and it's a beautiful planter. I might just try it; your instructions are great!
I love being able to see what people can create with succulents. Thank you Tamara for sharing this. I just posted the link on our facebook page.
Tamara,
Your creation is great and your tutorial should be most helpful to newbies. It's amazing how addicting these plants can become. There are so many varieties and choices, that the options are practically endless. I have Succulent Oasis and Succulent Beauties on the Etsy site, and both shops show many different varieties. Thanks so much for posting this. It's GREAT!!
Linda
Post a Comment